


Votes - 3, Average rating: 3.7
(

 )
)
|
Photos and specs Saitek ST90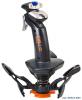 |


manual abstract
Made and printed in China. All trademarks are the property of their respective owners. ST90 V1.0 29/04/03 P/N ENGLISH FRANCAIS DEUTSCH Installing the Saitek ST90 on Windows® XP 1 With your computer switched on and all applications shut down, plug the Saitek ST90 into one of your computer’s USB ports. 2 The Found New Hardware callout will appear to inform you that the joystick has been successfully installed. 3 To test that Saitek ST90 is functioning correctly, click on Start on the Windows® Taskbar and then select Control Panel. 4 In the Control Panel list, select Printers and other Hardware, then double-click the Game Controllers icon. In the Game Controllers window select Saitek ST90. Note for users who have changed their XP® Desktop settings to Classic view: To test that the Saitek ST90 is functioning correctly, click on Start on the Windows® Taskbar and then select Settings and Control Panel. In Control Panel, double-click the Game Controllers icon, then in the Game Controllers window select Saitek ST90. 5 Next, click on Properties to open the Saitek ST90 Properties window. Click on the Test tab and try out the buttons and controls of your new joystick. 6 After testing your joystick, click OK twice to finish. Now it’s time to load your favorite game and enjoy the fun! Installing the Saitek ST90 on Windows® 2000 1 With your computer switched on and all applications shut down, plug the Saitek ST90 into one of your computer’s USB ports. 2 Your computer will automatically detect and load the drivers for your new joystick. 3 To test that your Saitek ST90 is functioning correctly, click on Start on the Windows® Taskbar and then select Settings and Control Panel. 4 In the Control Panel, double-click the Gaming Options icon, then in the Gaming Options window select Saitek ST90. 5 Next, click on Properties to open the Saitek ST90 Properties window. Click on the Test tab and try out the buttons and controls of your new joystick. 6 After testing your joystick, click OK twice to finish. Now it’s time to load your favorite game and enjoy the fun! Installing the Saitek ST90 on Windows® Me 1 With your computer switched on and all applications shut down, plug the Saitek ST90 into one of your computer’s USB ports. 2 Your computer will automatically detect and load the drivers for your new joystick. 3 To test that your Saitek ST90 is functioning correctly, click on Start on the Windows® Taskbar and then select Settings and Control Panel. 4 In the Control Panel, double-click the Game Controllers icon, then in the Game Controllers window select Saitek ST90. 5 Next, click on Properties to open the Gaming Options Properties window. Click on the Test tab and try out the buttons and controls of your new joystick. 6 After testing your joystick, click OK twice to finish. Now it’s time to load your favorite game and enjoy the fun! Installing the Saitek ST90 on Windows® 98 (Second Edition) 1 With your computer switched on and all applications shut down, plug the Saitek ST90 Joystick into one of your computer’s USB ports. 2 When the Add New Hardware Wizard appears, click Next and follow the on-screen instructions. 3 When prompted, select Search for the best driver for your device (Recommended) and click on Next. 4 At the following screen, select the CD-ROM drive option, insert your Windows® 98 (SE) CD and click on Next. 5 Continue to follow the on-screen instructions until the installation is complete, then click on Finish and remove your CD. 6 To test that your Saitek ST90 is functioning correctly, click on Start on the Windows® Taskbar and then select Settings and Control Panel. 7 In Control Panel, double-click the Game Controllers icon, then in the Game Controllers window, select Saitek ST90. 8 Next, click on Properties to open the Game Controller Properties window. Click on the Test tab and try out the buttons and controls of your new joystick. 9 After testing your joystick, click OK twice to finish. Now it’s time to load your favorite game and enjoy the fun! Installer le Saitek ST90 sous Windows® XP 1 Laissez votre ordinateur allume et fermez tous les programmes. Branchez votre Saitek ST90 sur un port USB. 2 Un message s’affiche automatiquement confirmant que votre joystick etait installe. 3 Pour tester votre Saitek ST90 cliquez sur Demarrer et choisissez Parametres. 4 Double cliquez sur Imprimantes et Autres , puis sur Game Controllers et choisissez Saitek ST90. Si vous avez choisi l’affichage classic du XP® : Double cliquez sur Game Controllers et choisissez Saitek ST90. 5 Puis, cliquez sur Proprietes. Cliquez Tester pour voir si votre joystick fonctionne. 6 Apres le test cliquez 2 fois sur OK. Maintenant vous etes pret a jouer! Installer le Saitek ST90 sous Windows® 2000 1 Laissez votre ordinateur allume et fermez tous les programmes. Branchez votre Saitek ST90 sur un port USB. 2 Votre ordinateur va decouvrir et installer automatiquement le pilote pour votre joystick. 3 Pour tester votre Saitek ST90 cliquez sur Demarrer et ...