


Votes - 4, Average rating: 4.3
(

 )
)
|
Photos and specs Sony DCR-HC23E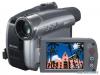 |


Other manuals for this model:


manual abstract
OPEN/EJECT lever Lid The cassette compartment automatically comes out and opens up. 2 Insert a cassette with its window facing outwards, then press . Push the center of the back of the cassette lightly. Getting Started Window Cassette compartment The cassette compartment automatically slides back in. • Do not force the cassette compartment closed by pressing the portion marked{DO NOT PUSH} while it is sliding in. It may cause a malfunction. 3 Close the lid. To eject the cassette Open the lid following the same procedure as described in Step 1 and remove the cassette. • For DCR-HC35E: Do not insert/eject the cassette while your camcorder is on the Handycam Station. This may cause a malfunction. Recording/Playback Easy Recording/Playback (Easy Handycam) With this Easy Handycam operation, most of Remove the lens cap (p. 14). the camera settings are automatically optimally adjusted, which frees you from detailed adjustments. The screen font size increases for easy viewing. A B EDC Recording 1 Slide the POWER switch A in the direction of the arrow repeatedly to turn on the CAMERA lamp. If the POWER switch A is set to OFF(CHG), slide it while pressing the green button. 2 Press EASY C. appears on the screen D. EASY 3 Press REC START/STOP B to start recording.* 60min REC FN0:00:00 The indicator (A) changes [STBY] to [REC]. A To stop recording, press B again. * Movies are recorded in SP (Standard Play) mode on a cassette. You can also start/stop recording by pressing the button E on the LCD frame. Playback Slide the POWER switch A in the direction of the arrow repeatedly to turn on the PLAY/EDIT lamp. Touch the buttons on the screen D as follows. If the POWER switch is Touch , then touch to set to OFF(CHG), slide it start playback. while pressing the green button. AC B A Stop B Play/Pause toggles as you touch it C Rewind/Fast forward x To cancel Easy Handycam operation Press EASY C again. disappears from the screen D. x Adjustable menu settings during Easy Handycam operation Touch and [MENU] to display adjustable menu settings. See page 36 for details on setting. • Almost all the settings return to the default setting automatically (p. 43). • Cancel Easy Handycam operation if you want to add any effects or settings to the images. Almost all the settings are returned to the previous situation. x Unavailable buttons during Easy Handycam During Easy Handycam operation, the following buttons are unavailable, since the items are set automatically. [Invalid during Easy Handycam operation.] appears if operations not available during Easy Handycam are attempted. • BACK LIGHT button (p. 24) • PHOTO button (p. 22) Recording/ Playback Recording Lens cap on the sides of the cap PHOTO POWER switch REC START/ STOP A Remove the lens cap by pressing both knobs REC START/STOP B 1 Slide the POWER switch in the direction of the arrow repeatedly to turn on the CAMERA lamp. If the POWER switch is set to OFF(CHG), slide it while pressing the green button. 2 Start recording. Movies Still images Press REC START/STOP A (or Press and hold PHOTO lightly to B). check the image (A), then press it fully (B). A Indicator appears The indicator (A) changes [STBY] to A B [REC]. A shutter sound is heard, and the image is recorded with sound for 7 seconds. CAPTURE To stop movie recording Press REC START/STOP again. • appears when the tape photo recording does not work. Playback 1 Slide the POWER switch in the direction of the arrow repeatedly to turn on the PLAY/EDIT lamp. 2 Start playing back. Touch to rewind the tape to the desired point, then touch to start playback. AC B A Stop B Play/Pause toggles as you touch it • Playback automatically stops if pause is engaged for more than 3 minutes. C Rewind/Fast forward To adjust the volume Touch t [PAGE1] t [VOL], then / to adjust the volume. To search for a scene during playback Touch and hold / during playback (Picture Search), or / while fast forwarding or rewinding the tape (Skip Scan). • You can play back in various modes ([V SPD PLAY], p. 42). Recording/ Playback Functions used for recording/playback, etc. 12 3 6 4 5 q; qdqaqs978qf Recording To use zoom...................... 1 qs Move the power zoom lever 1 slightly for a slower zoom. Move it further for a faster zoom. Wider range of view: (Wide angle) Close view: (Telephoto) • You cannot change the zoom speed with the zoom buttons qs on the LCD frame. • The minimum possible distance between camcorder and subject while maintaining sharp focus is about 1 cm (about 13/32 in.) for wide angle and about 80 cm (about 2 5/8 feet) for telephoto. • You can set [D ZOOM] (p. 45) if you want to zoom to a level greater than 20 .. • Be sure to keep your finger on the power zoom lever. If you move your finger off the power zoom lever, the operation sound of the power zoom lever may also be recorded. To record in dark places (NightShot plus) ................................... 2 Set the NIGHTSHOT PLUS switch 2 to ON. ( and [“NIGHTSHOT PLUS”] appear.) • The NightShot...
Other models in this manual:Cameras - DCR-HC24E (2.14 mb)
Cameras - DCR-HC26E (2.14 mb)
Cameras - DCR-HC35E (2.14 mb)