


Votes - 2, Average rating: 3.5
(


 )
)
|
Photos and specs Sony HT-SF1100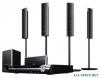 |


Other manuals for this model:
Home Theater Systems - HT-SF1100 (1.4 mb)
Home Theater Systems - HT-SF1100 (2.03 mb)
manual abstract
For details, refer to supplied speaker stand installation guide. Installing the speakers on the wall You can install your speakers on the wall. 1 Prepare screws (not supplied) that are suitable for the hook on the back of each speaker. See the illustrations below. a 4 WWWWWWWS» j more than 4 mm 1«-»1 more than 25 mm Hook on the back of the speaker 2 Fasten the screws to the wall. The screws should protrude 5 to 7 mm. HT-SS1100 only For greater flexibility in positioning the speakers, use the optional WS-FV11 or WS-FV10D speaker stand (available only in certain countries). Be sure to detach the screw from the speaker and use it when you install the speaker to the speaker stand. For details, refer to operating instructions supplied with the speaker stand. 12fifl 3 Hang the speakers on the screws. Example of installing the speakers on the wall Hook on the back of the speaker Notes •Use screws that are suitable for the wall material and strength. As a plaster board wall is especially fragile, attach the screws securely to a beam and fasten them to the wall. Install the speakers on a vertical and flat wall where reinforcement is applied. • Contact a screw shop or installer regarding the wall material or screws to be used. • Sony is not responsible for accident or damage caused by improper installation, insufficient wall strength or improper screw installation, natural calamity, etc. •For HT-SF1100, if you install the speakers on the wall, you do not need to attach the supplied speaker stand. o o 13GB Getting Started 2: Connecting speakers © Speaker cord (supplied)a) 0 Front speaker (Left) B Front speaker (Right) 0Center speaker TO Surround speaker (Left) E Surround speaker (Right) QSub woofer a)Use the long speaker cords to connect the surround speakers and the short speaker cords to connect the front and center speakers. Note Do not connect or disconnect the speaker cords to SPEAKERS terminals while the receiver is turned on. Note on speakers To connect the speakers correctly, be sure to check the type of speakers by referring to the speaker label* at the rear panel or bottom of the speakers. Character on Speaker type speaker label L Front left R Front right SL Surround left SR Surround right * The center speaker and sub woofer do not have the character on the speaker label. For details on the speaker type, see page 3. 14GB 3: Connecting the audio/ Connecting audio components tfirlan pnmnnnanto The following illustration shows how to VIUCU uUllipUIIGIIld connect audio components such as Super Audio CD player or CD player. How to hook up your components This section describes how to hook up your components to this receiver. Before you begin, refer to “Component to be connected” below for the pages which describe how to connect the audio/video components. After hooking up all your components, proceed to “4: Connecting the antennas” (page 20). Component to be connected To connect See Audio components page 15 • Super Audio CD player/ CD player Video components page 16 • DVD player/DVD recorder • Blu-ray disc player • Satellite tuner/Set-top box • VCR • TV Components with HDMI jack page 18 © Audio cord (not supplied) Getting Started Connecting video components The following illustration shows how to connect video components such as DVD player, DVD recorder, satellite tuner or VCR. If you connect a DVD recorder Be sure to change the factory setting of the DVD input button on the remote so that you can use the button to control your DVD recorder. For details, see “Changing button assignments” (page 50). Satellite tuner/Set-top box Audio rra DIGITAL OPTICAL ® signal Blu-ray disc player Audi ГИ1 DIGITAL OPTICAL j#L o signal SPEAKERS п=гь=гь=гь=п + IÄII!WJ)=CI)=C + _ _ FRONT R FRONT L SUR R SUR L © Optical digital cord (not supplied) B Audio cord (not supplied) © Coaxial digital cord (supplied) 16ee Notes •You cannot do recording on the DVD recorder or VCR via this receiver. For details, refer to the operating instructions supplied with the DVD recorder or VCR. •To input multi channel digital audio from the DVD player, set the digital audio output setting on the DVD player. Refer to the operating instructions supplied with the DVD player. • As this receiver does not have analog audio input jack for DVD, connect your DVD player to the DIGITAL COAXIAL DVD IN jack on the receiver. To output sound from the front left/right speakers only, press 2CH. • When connecting optical digital cords, insert the plugs straight in until they click into place. • Do not bend or tie optical digital cords. Tips • All the digital audio jacks are compatible with 32 kHz, 44.1 kHz, 48 kHz, and 96 kHz sampling frequencies. • To output the sound of the TV from the speakers connected to the receiver, be sure to: - connect the audio output jacks of the TV to the TV AUDIO IN jacks of the receiver. - turn off or mute the TV’s volume. ...
Other models in this manual:Home Theater Systems - HT-SS1100 (720.09 kb)