


Votes - 5, Average rating: 4.2
(

 )
)
|
Photos and specs Hyundai H-CMD7079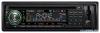 |


manual abstract
Press it again or use the VOL/SEL knob on the panel or press the VOL+/VOL- buttons on the RC to cancel. Adjusting clock 1. Press and hold CLOCK DISPLAY button for more than 3 seconds to select the hour setting. Hour digits will blink. 2. Rotate VOL/SEL knob to set the hours. 3. Press VOL/SEL knob to select the minute setting. Minute digits will blink. 4. Rotate VOL/SEL knob to set the minutes. 5. Press CLOCK DISPLAY button, or leave the unit idle. Time setting is now confirmed. 16 Radio operations_ Note: RDS (Radio Data System) service availability varies with areas. Please understand if RDS service is not available in you area, the following service is not available, either. Choose Radio Band Press BND/SYS button on the RC or BD/NP/SUB button on the panel to select a band. The unit has with five bands: FM1, FM2, FM3, MW1 and MW2. Each of the five bands can store up to six preset stations, for a total of 30 preset memory stations. Radio Tune/Seek Function Press NEXT/SEEK+ or PREVIOUS/SEEK- buttons on the RC or PREVIOUS/NEXT buttons on the panel to manually adjust the radio frequency. Press and hold these buttons, the radio will automatically seek for the next up or down strong and clear frequency station. Repeat this action to seek for other desired stations. Mono/Stereo Reception Control In FM radio mode, press the ST/PROG button on the RC to select stereo or mono reception. “ST ON” will show on the display indicating that stereo reception is received. Improvement of reception of distant stations can be done by selecting “ST-PROG” operation which may cut down some reception noise. Local/Distance Reception Press the LOC/RDM button on the RC to select local or distant stations reception. “LOC ON” shows on the display, meaning that local reception is turned on; “LOC OFF” shows on the display, meaning that distant reception is turned on. Local and distance reception setting can facilitate the radio reception, depending on the location in which the radio is being used. 17 Save Your Preset Stations There are six numbered preset buttons, which can store and recall stations for each band. If while listening to a radio station you would like to save the station as a pre-set, press and hold one of the numeric buttons 1-6 until you hear a beep. The button you pressed is now the pre-set button for that station. Automatic Store/Preset Scan Automatic Scan and Store While listening to the FM radio, press and hold APS button for 3 seconds. The unit will automatically scan and save stations for all the 3 FM bands, whichever band (FM1, 2 or 3) you are listening to. While listening to the AM radio, press APS button for 3 seconds. The receiver will automatically scan and save stations for the 2 AM bands, whichever band (MW1 or 2) you are listening to. Scan Saved Stations Press APS button on the panel or AMS button on the RC once to perform the scanning functions. In FM mode, press APS button on the panel or AMS button on the RC and the stations in that FM band will be scanned; press the buttons in AM mode and scan the band stations of that AM band. RDS-EON CONTROL This unit is equipped with the latest technology of EON control, so that when you are listening to Radio or CD, if there is any travel announcement from a nearby local station, the radio will already know the frequency of that radio station. Then it will receive the station, turn up the volume, or interrupt the playback of the music for the duration of the announcement. At the end of the announcement the radio will return to its previous state ready for the next announcement. AF-ALTERNATIVE FREQUENCY Press 7/AF numeric button on the panel so that the unit will choose the strongest FM signal for the selected station, 18 so that you do not have to re-tune the stations when driving between different transmitter coverage areas. When AF is on, it means RDS information is received; when AF is flashing, it means RDS information is not yet received. TA - TRAFFIC ANOUNCEMENT Press 8/TA numeric button on the panel so that the unit will be activated for reception of traffic announcement from local radio stations. To choose the TA mode, press and hold SEL button for 2 seconds, the display will show TA SEEK. Rotate VOL/SEL knob to choose between the TA SEEK and TA ALARM, after choosing, please leave the unit idle for the mode to activate. In TA SEEK mode the unit will seek for traffic announcement program when 8/TA numeric button is pressed; in TA ALARM mode, no TA/TP is displayed and the alarm is set off. PTY - PROGRAM TYPE This radio will allow you to select the type of program required, and will search for a station broadcasting that type of program. Press the 9/PTY numeric button on the panel once to show the music type. Then press 1-6 buttons to choose different music types available. Press 9/PTY numeric button twice to show the speech type program. Then press 1-6 buttons to choose different speech type programs. Each number button will...