


Votes - 24, Average rating: 3.4
(


 )
)
|
Photos and specs Hyundai H-CMD4000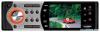 |


manual abstract
Press PTY button for 2 seconds to choose LOCAL, press it again for 2 seconds to switch to DX. 5. PRESET STATION [ 1 -6] buttons 6. RPT button Use this button to play current track repeatedly. 7. INT button Press it to start intro playing (10 seconds). 8. PLAY/PAUSE button Use this button to start playback. Press it to pause playback. 9. VOL knob/ SEL button Rotate VOL knob clockwise to increase the volume level; rotate anticlockwise to decrease the volume level. Press SEL button repeatedly to select the modes: BASS => TREBLE => BALANCE => FADER. Press the SEL button and hold for 2 seconds to enter the menu mode. Press it repeatedly to select the modes: EQ MODE => LOUD => BEEP => CAMERA => 12/24 AREA => TA MODE => RETUNE => PARKING MODE => MIRROR IMAGE => TA-VOL => VOL-MODE => A-VOL => SUBWOOFER => SUBW-LOL. Rotate VOL knob to adjust the mode. 10. RDM button Press to start the random playback. 11. P/N button Press it to switch the video system (PAL/ NTSC/AUTO). 12. R/L button Press it to switch the DVD and VCD audio channel (L/R/ST). 13. AMS button Press it to activate the Radio Auto preset function. 9 14. SRC button Press to select the source: Radio, Disc play, USB, SD Card, Aux-in. 15. BAND button Press it repeatedly to select your desired radio band during RADIO mode. 16. IR sensor 17. TFT display 18. PREVIOUS ( 9 )/ NEXT ( : ) buttons Use these buttons to enter the manual tuning mode/ seek tuning mode. Use this button to search for the beginning of the previous/ next track, for backward/ forward track scanning. 19. PWR/ MUTE button Press PWR button to turn the power on, press and hold for 2 seconds to turn the power off. When the power is on press it to cut down the volume output, press it again to resume volume. 10 Remote control 1. ZOOM button (for DVD/VCD only) 2. TITLE button (for DVD only) 3. PWR button 4. SETUP button 5. Directional buttons for menu selection 6. ENTER button 7. PROG button 8. Digit area 9. SEL button: press it to select basic sound setting options 10. VOL +/- button 11. MUTE button 12. SEEK +/- buttons: use these buttons to enter the manual tuning mode/ seek tuning mode. Use this button to search for the beginning of the previous/ next track, for backward/ forward track scanning. 13. SUB.T button (for DVD only) 14. SRC button: press to select the source: Radio, Disc play, USB, Card, Aux-in 15. REPEAT button 16. A—*B button 17. STOP button 18. PLAY/PAUSE button 19. GOTO button 20. MENU/PBC button 21. OSD (On Screen Display) button 11 22. AUDIO button 23. DISP button 24. ANGLE button (for DVD discs only) 25. BAND / P/N button: press it repeatedly to select your desired radio band during RADIO mode. Press it repeatedly in VIDEO mode to select video system: PAL/NTSC/AUTO. Changing the battery 1. Press the catch and at the same time pull out the battery tray. 2. Insert the 1 x lithium battery, type CR 2025 3V battery with the stamped (+) mark facing upward. Insert the battery tray into the remote control. Warning: Store the battery where children cannot reach. If a child accidentally swallows the battery, consult a doctor immediately. Do not recharge, short, disassemble or heat the battery or dispose it in a fire. Do not expose or bring into contact the battery with other metallic materials. Doing this may cause the battery to give off heat, crack or start a fire. When throwing away or saving the battery, wrap it in tape and insulate; otherwise, the battery may give off heat, crack or start a fire. 12 Back of the front panel Press the l±i button on the front panel to flip it down. 1 1. Disc slot 2. EJECT button 3. Panel status indicator 4. RESET button 5. SD/MMC card socket 3 4 2 5 Note: Pressing the RESET button will erase the clock setting and stored stations. Panel status indicator lights up when you slide the panel down; flashes when you remove the panel. 13 General operation Reset the unit Operating the unit for the first time or after replacing the car battery, you must reset the unit. Press l±i button on the panel to open the panel and press the RESET button to restore the unit to the original factory settings. Power button Press PWR button to turn the unit on. Press and hold it for 2 seconds to switch the unit off. Note: After the unit is off, the volume level and radio current settings will be memorized, and when you turn the unit on it will resume the stored status which you set. Volume control Rotate the VOL knob on the panel clockwise or press the VOL + on the RC to increase the volume level. Rotate the VOL knob on the panel anticlockwise or press the VOL - on the RC to decrease the volume level. Setting the sound characteristics Press shortly and repeatedly the SEL button to select the audio setting: BASS => TREBLE => BALANCE => FADER. Rotate the VOL knob to adjust each setting. The display will show the following: Note: If turning off the power all the settings of each mode...
Other models in this manual:DVD Players - Excellence H-CMD4000 (1.21 mb)